Today I will tell you how you can fix sound problems in Windows 11. As soon as you update or upgrade your Windows 10 to Windows 11, then you face this problem, to solve this you have to update the audio drivers of your computer, whose whole process we will tell you here.
More Questions About Windows
- Windows 10 Free Download.
- Windows 11 Download and Install 2021.
- Reset Windows 10 Without Losing Data.
- 10 Ways to Speed Up Windows 10.
- Bypass Windows 10 Password Without Software.
- Upgrade From Windows 10 Home to Pro 2021.
- Fix “This PC Can’t Run Windows 11” Error – Fix the TPM 2.0 error.
Fix sound problems in Windows 11.
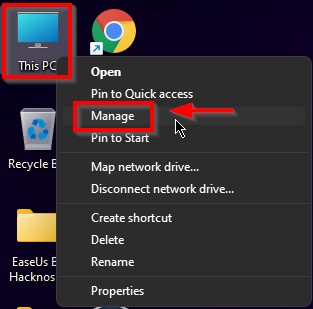
First of all, you have to right-click on this PC and then click on the manage button so that the settings of all the devices and drivers related to your laptop or computer will open and you can control everything from there.
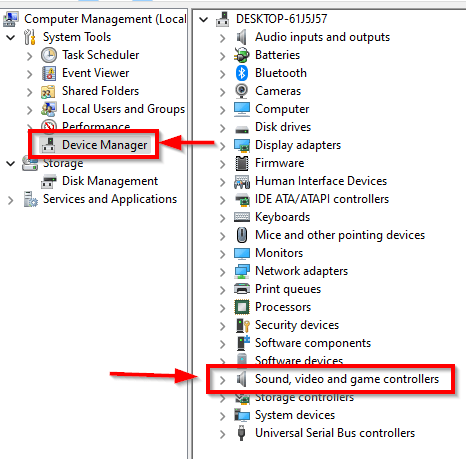
After this, some kind of interface will open in front of you, here you have to click on the option of Device Manager and then you have to click on the option of Sound Video and Gaming Controls given on the right side, from here you can access sound drivers your laptop or computer. You can select the option of sound.

You will see all the sound drivers installed on your computer, here you have to right-click on Realtek audio and then click on the update driver option so that we update our Realtek audio drivers.
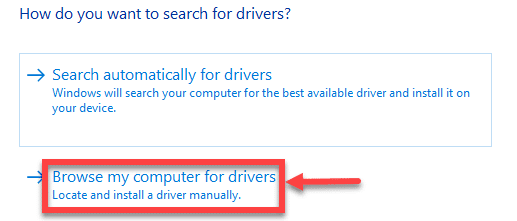
After this, a window like this will open in front of you, here you have to click on Computer for Drivers in the second option browser so that you can install the drivers available on the computer.
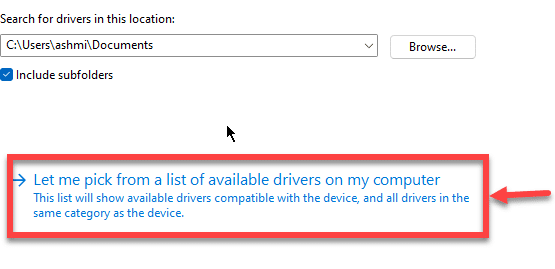
After this, a window like this will open in front of you, here you have to select the option given below, inside which you will be shown a list from where you can select which driver you want to install on your computer.

After completing all this process, now the list of drivers will come in front of you, here you have to select the first option High Definition Audio Device, and click on the Next button. The driver you will select here will be installed on your computer.
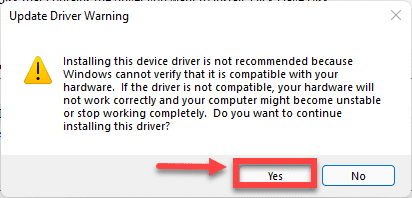
After this, you will get a message like this in front of you, here you are being told that the driver you select does not support your computer and is not compatible with your computer, you have to ignore this message and hit the Yes button. Click on the.

After this you will see whether you just selected the driver from the list, it has been successfully installed and updated, now you have to update your audio driver online.
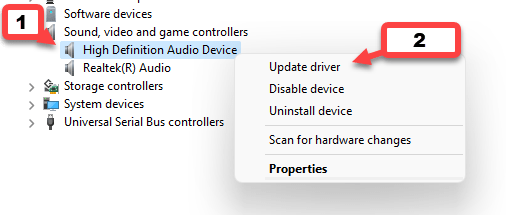
For this, you have to select the audio drivers from the back and then click on the update driver button. From here you can select all the drivers you want to update.
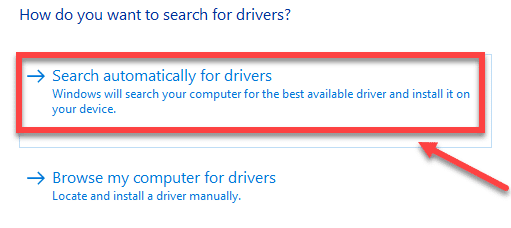
After this, a window like this will open in front of you, here you have to select the first option Search automatically for the driver so that your laptop will install online by searching for audio drivers related to your laptop or related to the computer.
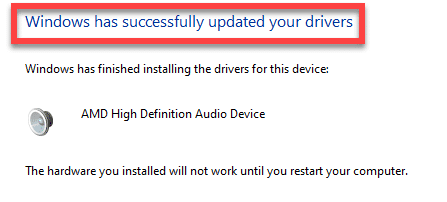
After this, you can see that our online drivers have also been installed successfully, after this all your audio-related or sound-related problems will be fixed.
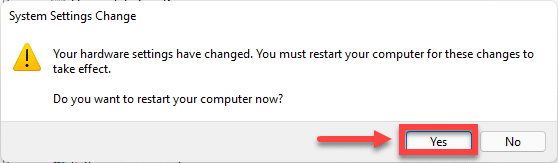
After following all this process, now, at last, you have to restart your computer so that the drivers installed by you will start working properly and you do not have any problem.
Win10 audio, not working speakers not working windows 10 fix sound problems in windows 10 windows sound not working windows 10 sound problem.
